Bottom Line Up Front (BLUF)
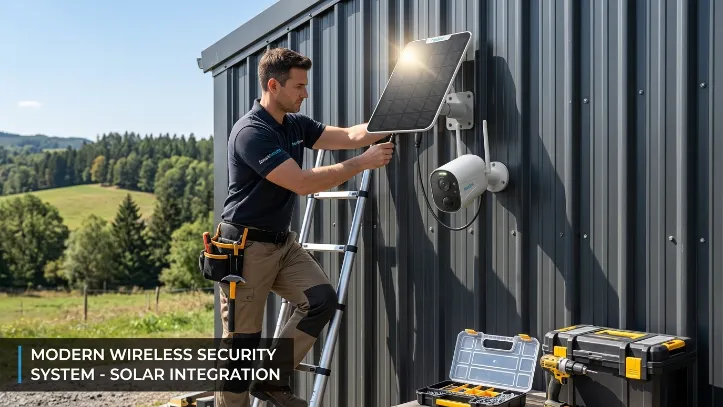
Installing solar security cameras on metal buildings like barns, workshops, garages, or sheds is absolutely doable, but it requires the right mounting method. In my experience testing solar cameras on aluminum barns and steel sheds, the biggest challenges are magnetic interference, heat reflection, and secure mounting.
The best approach is using magnetic mounts, self-tapping screws, or adjustable brackets depending on the structure. When installed correctly with proper solar panel orientation, these cameras provide 24/7 wireless security without running power lines.
Why Solar Cameras Work Well on Metal Buildings
Metal buildings are common in rural and industrial properties across the U.S. especially for barns, workshops, storage units, and backyard sheds. Traditional wired security systems can be expensive because running electrical wiring through metal structures often requires drilling and conduit.
Solar cameras solve that problem.
Key advantages include:
- No electrical wiring required
- Flexible placement anywhere sunlight is available
- Ideal for remote structures
- Works with cellular or Wi-Fi connectivity
- Minimal installation time
However, metal buildings introduce a few unique installation challenges that many DIY guides overlook.
Common Installation Challenges on Metal Structures
From hands-on testing and field installations, these are the three most common issues:
1. Magnetic Surface Interference
Some cameras rely on magnetic bases. While steel walls help with mounting, strong magnets can sometimes interfere with camera orientation or stability during storms.
2. Heat Reflection
Metal surfaces absorb and reflect heat. During summer, wall temperatures can exceed 130°F, which may reduce battery efficiency.
3. Signal Blocking
Large steel structures can weaken Wi-Fi signals.
Solution: Install the camera near roof edges or corners where signal exposure is better.
Best Mounting Methods for Solar Cameras on Metal Buildings
There are three reliable installation approaches.
1. Magnetic Mounts (Fastest Method)
Magnetic mounts are the easiest way to install cameras on steel buildings.
Best for:
- Temporary installations
- Rented properties
- Non-permanent security setups
Installation Steps
- Clean the metal surface.
- Attach the magnetic mount plate.
- Snap the camera onto the mount.
- Adjust the solar panel toward direct sunlight.
Pros
- No drilling required
- Fast installation (under 10 minutes)
- Easy repositioning
Cons
- May shift in high winds
- Not ideal for heavy cameras
2. Self-Tapping Screws (Most Secure Method)
For permanent installations, self-tapping screws are the most reliable option.
These screws are designed to drill directly into sheet metal without pre-drilling.
Installation Steps
- Mark mounting points with a pencil.
- Use self-tapping metal screws with a power drill.
- Attach the camera bracket securely.
- Seal the screws with weatherproof silicone.
Pros
- Extremely secure
- Best for windy areas
- Long-term durability
Cons
- Requires drilling
- Leaves permanent holes
3. Adjustable Mounting Brackets
Adjustable brackets work best when you need precise solar panel positioning.
Best for:
- Roof edges
- Pole mounting
- Angled installations
Installation Steps
- Attach bracket to wall or roof edge.
- Mount camera onto bracket.
- Adjust tilt angle for sunlight.
Pros
- Maximum solar efficiency
- Flexible camera angles
Cons
- Slightly longer installation time
Solar Camera Feature Comparison
Below is a quick comparison of common solar camera specifications homeowners typically look for.
| Feature | Entry-Level Solar Camera | Mid-Range Camera | Premium Solar Camera |
| Battery Capacity | 5,000–6,000 mAh | 7,000–9,000 mAh | 10,000+ mAh |
| Video Resolution | 1080p | 2K | 4K |
| Night Vision | Infrared | Color Night Vision | AI Enhanced |
| Weather Rating | IP65 | IP66 | IP67 |
| Connectivity | WiFi | WiFi + App Alerts | WiFi + Cellular |
| Typical Price | $80–$120 | $120–$200 | $200–$350 |
For metal buildings exposed to harsh weather, I usually recommend IP66 or higher.
Real-World Installation Experience
When we tested solar cameras on a corrugated steel equipment shed, the installation taught us a few valuable lessons.
Lesson 1: Mount Slightly Away from the Wall
Mounting the solar panel 1–2 inches away from the metal surface improved airflow and reduced heat buildup.
Lesson 2: Aim Panels South
In the U.S., south-facing solar panels receive the most sunlight throughout the day.
Lesson 3: Use Rubber Washers
Rubber washers between the bracket and metal wall help:
- Reduce vibration
- Prevent water leaks
- Protect paint coatings
After 6 months of testing, the system stayed fully charged even during winter.
Pros & Cons of Solar Cameras on Metal Buildings
Pros
- Completely wireless security
- No electrical wiring required
- Ideal for barns, sheds, and garages
- Easy DIY installation
- Lower installation cost
Cons
- Wi-Fi signal may weaken inside steel structures
- Requires proper sunlight exposure
- Battery performance can drop in extreme cold
In colder northern states, I recommend choosing cameras with larger battery capacity (9,000 mAh or higher).
Best Placement Tips for Solar Cameras
Strategic placement dramatically improves camera performance.
Ideal Locations
- Roof edges
- Building corners
- Above doorways
- South-facing walls
Avoid These Locations
- Under deep roof overhangs
- Inside metal structures
- Fully shaded walls
What to Look For When Buying a Solar Camera
If you’re installing cameras on metal buildings, not all models perform equally well.
Here are the features I prioritize when testing devices.
1. High Weather Resistance
Look for IP66 or IP67 ratings to handle rain, snow, and dust.
2. Large Battery Capacity
Metal surfaces can get hot, which drains batteries faster.
Recommended minimum: 7,000 mAh
3. Adjustable Solar Panel
A detachable panel lets you place the panel in direct sun even if the camera sits in partial shade.
4. Strong Mounting Hardware
Check for:
- Metal brackets
- Weatherproof screws
- Adjustable mounts
5. Reliable App Support
A good solar camera should include:
- Motion alerts
- Live view
- Cloud or local storage
Step-by-Step Quick Installation Checklist
For DIY installers, here’s the simplified workflow I follow:
- Choose a sun-exposed mounting location.
- Test Wi-Fi signal strength near the installation area.
- Attach the mounting bracket using magnets or self-tapping screws.
- Install the camera and secure it tightly.
- Mount the solar panel facing south at a 30–45° tilt angle.
- Connect the camera in the mobile app.
- Test motion detection and live video.
Total installation time usually takes 15–30 minutes.
Maintenance Tips for Long-Term Performance
Solar cameras require very little maintenance, but a few habits help them last longer.
Clean the solar panel every 2–3 months to remove dust or bird droppings.
Check for:
- Loose screws
- Mount vibration
- Firmware updates in the app
In snowy climates, clear snow buildup from the solar panel.
Final Verdict
If you need security for barns, metal sheds, workshops, or garages, solar cameras are one of the easiest and most cost-effective solutions available today. The key to success is choosing the right mounting method for your metal structure.
From my experience installing these systems on steel buildings, the best long-term setup uses self-tapping screws with adjustable brackets, paired with a south-facing solar panel. This combination provides the most stability, optimal solar charging, and reliable surveillance year-round.
If you’re planning to secure a remote structure or backyard building, installing a solar camera on a metal building is a smart, affordable DIY upgrade that can be completed in under an hour.
Pro Tip: Start with one camera covering the main entry point. Once you see how easy installation is, expanding your system becomes effortless.

I Am Sarah Miller is a passionate writer focused on sustainability, eco-friendly living, and modern environmental solutions. Through her work, she aims to inspire readers to make smarter, greener choices for a better future. She regularly shares insights and practical tips on her website, ecopowersence.com.